So – you’re back from your summer mapping project, the fun is over, and you are faced with the enormous task of writing up your mapping dissertation. You should hopefully receive some guidance from your university about any specific rules and guidelines they might have, but here are a few general tips on what you could include:
THE MAP ITSELF
The map itself will be the centrepiece of the project – a large poster displaying a neat copy of the map, a cross section and a key. I also included a few key stereonets, an aerial photograph and a location map on mine. My map is now, I’m slightly ashamed to say, framed and hung on my wall. The map can be the ultimate souvenir of your summer away, so chose a good colour scheme!!
1. Drawing programme
Many students use GIS to draw their final map. This takes time to master, but it can be a good investment as GIS is used regularly in many industries.
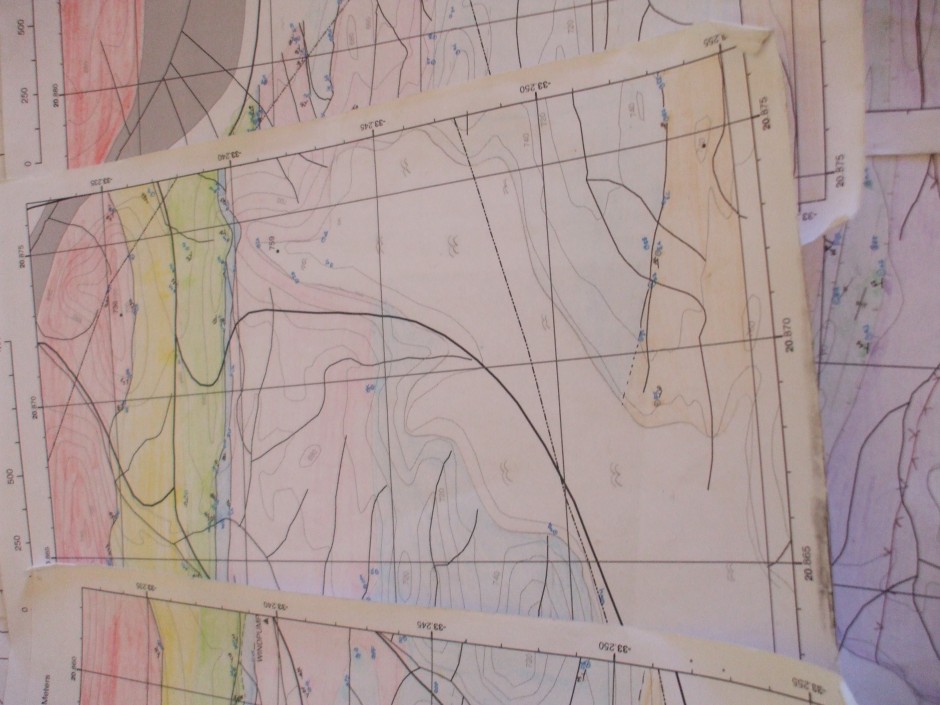
Field slips need to be transformed into a final map
Alternately, you can scan in good quality field slips and trace over them using a drawing programme such as inkscape (available free online) or coral draw. This is mind-numbing, time consuming work, but you can listen to music or chat away and be left with a pretty professional looking map at the end.
A few brave souls draw their final maps by hand. This is acceptable in many universities, but you have no back up and can’t make multiple copies. Not recommended!
2. Interpretation
It is okay to seek supervision once back at university for help interpreting the tricky parts. You can change your interpretations after leaving the field, so long as all of your interpretation is backed up by observations and measurements you actually made in the field.
You will also need to make a cross section, which means sticking your neck out and suggesting what’s going on underground. Chose a cross section line that cuts through the major features of the mapping area, but don’t worry about covering everything. You can include mini-cross sections of smaller complex areas within the thesis.
THE THESIS
Some core chapters will be shared across all mapping projects, but additional chapters will be individualised according to the geology in the area. Here are some ideas for possible sections you could include in your dissertation.
1. Abstract
Describe the key lithologies and structures, and highlight any new findings or interpretations. Did you see a fossil that hasn’t been reported in this unit before? Did you define a new formation rather than sticking with existing stratigraphic columns?
2. Contents
Each section should be labelled with a dominant number or letter, and each subsection with a suboordinate letter or number. This allows you to refer back to other sections and diagrams throughout the dissertation.
3. Introduction
This should provide a geological overview, framing the mapping area in its wider context. Is your map located on the apex of a much larger regional anticline? Were your rocks deposited in an ice house or a greenhouse? On a supercontinent or a lone continenal block? The introduction can also include a bit about logistics (e.g. Position was measured using GPS on WGS 84 setting, with 24o West declination, in degrees and decimal degrees of latitude and longitude.)
4. Lithologies
Begin with a simple summary paragraph accompanied by a rough stratigraphic log of the whole succession. Then go through each Supergroup, Group, Formation and member, starting with the oldest. Any detailed stratigraphic logs or field sketches should be included alongside the relevant lithology, ideally traced from field notes into digital form using a drawing programme. You should also include photos from the field and of any thin sections you have, all with key features labelled.
5. Structures
Begin with an overview – is there a dominant direction for contacts, fold axes, faults? It can be helpful to include a condensed A4 version of the main map and label all of the key structures that you will be addressing within the section. Break the structures down into manageable sections (e.g. ‘main anticline’, ‘northern fault’), and include stereonets, cross sections, simplified structural diagrams and labelled photos. You could also include some aerial photos of complex sections with acetate overlays that show your interpretations.
6. Sedimentology (if relevant)
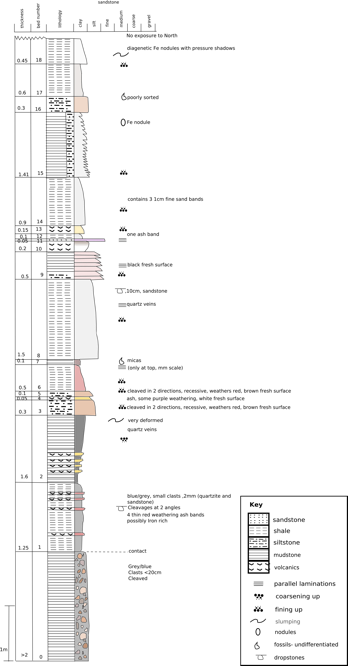
A sedimentary log
You have described any sedimentary units in the lithologies section, but here is where you can discuss the origin of the sediment and the formation of sedimentary structures. What environment were the sediments deposited in – was it anoxic? Shallow marine? Were there strong currents or winds? This is also where you would include any palaeocurrent rose diagrams, if you were able to take measurements on ripples whilst in the field.
7. Geomorphology (if relevant)
How is the landscape and surface sediment you observed in the field related to the underlying geology? You could speculate on why rivers take certain paths, or where landslides might occur. You could create an overlay of your map on top of an aerial photo, to highlight where lithological changes coincide with ridges and valleys.
8. Synthesis
This should bring together all of your key observations and interpretations into one story, that explains the structures and lithologys in the context of the regional climate and tectonics. This is your chance to show the examiners you truly understand your mapping area!
9. Acknowledgements and references
Figures: Remember, as ever, that all diagrams need a scale, a way up arrow and a north arrow. Figure captions should be numbered in a logical order, and include the coordinates of the location that the photo or diagram refers too. It is also okay to lift figures from other publications, so long as they are acknowledged and referenced.
We hope that helps! If you have any further advice then please feel free to use the comments box below to share it with us.
If you are undertaking field work or mapping projects this summer that could have a development aspect, why not consider presenting your findings as a poster at our first National Conference?
Pingback: Professionalism and Social Responsibility (3): ...